Resurgence, Insurgence, Infusence

*knock knock*

Hallo? Hi little boozeangels. This blog lost all its momentum when I started working, LIKE SOME KIND OF SUCKER. But, I just recently finished a program, quit a bartending gig, and am now toying with bringing this back. Individual posts are still getting a heckload of hits, people linking? I don’t even know. What I do know is I will be launching a bartending gig job hunt starting in 8 seconds and maybe y’all can follow along?

’til then

Posted in Uncategorized | Leave a comment

Ancho glad I’m finally updating this?

GUYS. I made a huge veggie chili the other day (househusbands need to stay relevant in this economy). Part of the process for me–whenever cooking up a giant vat of heavily spicy/flavorful anything–is digging through the spice cabinet and pantry to see what borderline too-old ingredients I can chuck in the pot. I divide the pantry like this: front half is for kitchen/foodstuffs, back half (there’s a door there too–hard to explain) is for home brewing and infusing supplies/projects, and the middle half is for all the crap that piles up on top of everything. The middle half is often the biggest half.

I need to brush up on my maths.

Ancho pepper

Ancho!

Pointless story pointed: I found a long-lost bag of DRIED ANCHOS buried under the avalanche of the middle half. You need to try these guys. When fresh they are poblano peppers. When green they are dark dark almost black and they usually ripen to very red. The green ones dry out to look black and have an almost smoky, earthy taste with usually just a hint of heat (this varies dramatically). I’m not as hip to tex-mex cooking, but I think anchos are used in mole sauces. I do know the ground ancho is a great spice rub base for skin-on chicken. Try it!

Anyhow, I crumbled up most the ancho to throw in the chili, but saved one. I combined it with 1.5 cups of vodka and forgot about it for 2 weeks. Except when I remembered about it every few days and gave the jar a shake. The vodka turned a deep rich amber-ish color. The ancho started to look like a horror movie prop.

Then I had some guinea pigs come visit and we did “sipping” shots.

GUYS IT’S LIKE DRINKING A TACO. Have you ever done a shot of taco? If not, your life could be so much happier.

I haven’t tried this in any mixes yet, but I am sipping a small bit right now (I *had* to pour some for the photo below. It’s for science.) Anchos are readily found in Latin markets or any market with a Mexican/Central American section or even just a big variety of ethnic foods. I’ve bought them at Whole Foods as well, but they are mad overpriced.

Also, check out my DIY floor restoration job. Photo by Michael Paydos, https://dazedandinfused.wordpress.com 2013.

Also, check out the DIY floor restoration. Photo by Michael Paydos, https://dazedandinfused.wordpress.com 2013.

Posted in Uncategorized | Leave a comment

Gone to Seed: Lime Basil Infused Vodka

I overdid things on the gardening front this year (“He Overdid It” will likely end up on my tombstone some day). Especially exciting for me were the multiple varieties of basil I had planted in both containers and along the garden beds.

However, a trick with basil is you should snip off the flowers as they appear, which encourages more leafy basilly growth. Being lazy/busy, I’d come out to see flower stalked on every basil plant on a regular basis.

Sweet basil gone to flower. Photo by Michael Paydos, 2012. dazedandconfused.wordpress.com

Sweet basil gone to flower.

Basil buds/flower sprouts/whathaveyou taste the same as the basil leaves, perhaps a bit more intense. The drawback is they are a bit woodier and if gone to actual seed a lot more bitter.

They work perfectly for infusing.

Lime basil

Lime basil tastes surprisingly similar to kaffir lime and is at the very least an acceptable substitute. Of the basil varieties I grew, it is the least similar to your generic sweet basil in taste.

Lime basil. Photo by Michael Paydos, 2012. dazedandinfused.wordpress.com

Lime basil just going to flower.

Components

  • Lime basil buds, tender shoots, flowers, and woodier leaves
  • Vodka

Instructions

  • Rinse basil well and pick out any bits that have gone to seed. You can use the tender green leaves as well, but those would better serve you in recipes (try in thai soups and seafood dishes!)
  • Put basil bits in a glass jar and add just enough vodka to cover.
  • Set aside in a cool, dark place for about 2-4 weeks.
  • Pour through a metal strainer and store in a cool place out of direct sunlight.

Tip: These exact instructions, exchanging vinegar for vodka, makes a fantastic flavored vinegar.


Image

Uses:

  • Sip it neat!
  • As a substitute for lime juice and vodka when you want a lower acid alternative
  • In a cosmo, bloody mary,
  • With soda water, tonic, ginger ale, or Sprite

Second thoughts kamikaze

  • 2 oz lime basil infused vodka
  • .5 oz triple sec
  • maraschino cherry

Shake first 2 ingredients with ice and strain into a cocktail glass. Garnish with cherry.


Basil flower sour

Shake all ingredients with ice and strain into a cocktail glass. Garnish with a twist.

Posted in Uncategorized | 1 Comment

Lime basil

Lime basil

Lime basil going to flower. Photo by Michael Paydos, 2012.

Posted in Uncategorized | Leave a comment

Summer planning

This past week, I believe (think?) I’ve finished most of the gardening prep work for the year. One exception: I may buy a few more potted herbs for my herb garden. 

This past week we have also finished off much of the “wedding infusions” (we made about 20 1 liter batches of various infusions). As the stock gets low, we now have room for more fun–the plan is to recreate some old favorites while also experimenting with some new things. Growing now:

  • Thai basil
  • Lime basil
  • Basil basil
  • Spearmint
  • Mexican tarragon (has a minty-tarragony-anise sort of flavor, but mild)
  • Broccoli
  • Chives
  • Raspberries & blackberries
  • Thyme
  • Mint
  • Chocolate mint
  • A lighter green mint that I inherited and have kept going so far
  • Catnip
  • Lavendar
  • Lemon balm
  • Parsley
  • Cilantro/coriander
  • Spanish hot peppers
  • Lots of stuff probably not appropriate for infusing
  • Many herbs from last year that popped back up

A note on chives: I am hoping I didn’t miss my window, but the first chive (bush?) made these poofy purple flowers that had a wonderful chive flavor that has hints of sweetness to it. he flowers are still there, but I suspect nectar-drinking bugs/birds/bats have drained them a bit–they now just taste intensely chivelike and bitter. Probably good as a seasoning when making stock. If the smaller seedling I have planted flowers later, I plan on giving it a go.

I also have tons of strawberries, but you know what else I have? Squirrels. Fat, strawberry-stuffed, squirrels.

Posted in Uncategorized | 4 Comments

How to make cider, for real

It’s been so long, what happened?

Well, I bought a house, discovered the art of brewing, discovered the sport of power tools and home maintenance, and decided I really want a loft lounge in our victorian attic.

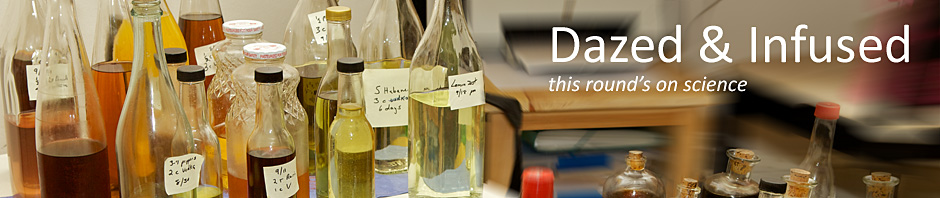
But! I’d like to get back in, so here are some tips on making your own cider. I will try to repost with photos soon, but it’s really quite simple.

Let’s start with a 1-gallon batch, for simplicity’s sake. As luck would have it, Whole Foods sells a 1-gallon glass jug of organic apple juice. It’s not the best juice to make cider with, but it’ll do!

Get a #6 rubber stopper with a hole drilled in it–brew shops sell em for a buck.

Get a plastic airlock–also a buck or two at brew shops. Several home brewing websites also sell them, some through amazon.

You will need brewing yeast as well. You have two options: a white wine yeast or an ale yeast. Wine yeast will result in a nearly bone dry result, the ale will have a bit more character, but benefits from aging more. Lavlin White Wine yeast adds nice glycerin notes, making it less shockingly light and dry; nottingham ale yeast is a fine ale choice.

You will also need some sort of sanitizer. You’ll read how critical this is on a lot of online forums, and it’s true. However, cider is a lot more forgiving of a bit of bacteria than other fermented beverages (basically, apple juice is nothing but simple sugars, so the yeast will win out in the end almost every time).

A teaspoon of bleach with a couple cups of cold water will be fine. I prefer star san no rinse sanitizer.

Rub everything down in sanitizer. If you are using bleach or another not no-rinse type, be sure to rinse thoroughly. Tap water will have minute amounts of harmless bacteria–this isn’t great for your cider, but it isn’t the end of the world.

A packet of yeast is made for 5 gallons. Again, sites will say you shouldn’t save any for later. My experience differs. I have opened a packet, taken roughly a quarter out for a batch, and wrapped the rest in clear plastic wrap and stored it in the fridge–I’ve yet to have an issue after about 15 batches.

So! Bring a half cup of water to a boil then let it cool to 80-90 (will feel warm but not hot)–don’t stick your fingers in the water, dope. Hot tap water might be OK, but I am usually wary of that. Let the yeast (1/4 or more of the packet) sit in there for 5-10 minutes.

Meanwhile, dump out about half a cup of juice. Put cap back on and shake bottle. Open cap and let things air out for 15 seconds. Put cap back on and shake some more. Repeat a couple times if you can. This is to get some oxygen into the juice, which the yeast needs to multiply and thrive.

Dump the yeast into the jug and gently shake to make sure things are mixed up. Put the stopper and airlock on and store in a dark place with a suitable temperature for the yeast–usually 60-70. A bit outside those lines is usually OK.

After 24-48 hours, things should be bubbling up like nobody’s business. In 5-10 days, the bubbling will slow down and eventually stop. There will be about an inch of sludge at the bottom of the jug that sort of looks like peanut butter. When the bubbling appears to stop, give it a light shake, which should release a bit more carbon dioxide. To be safe, wait a day or two more.

Bottling time! You can technically just throw the whole thing in the fridge and enjoy as is. It won’t be very carbonated though. If you want bubbles!:

Get 3 1 liter flip top bottles and 1 half liter one (or any combo of such bottles to get 3.5 liters. Like these. A restaurant supply shop near my house sells the liter size for $3.

Sanitize the bottles–my dishwasher has a sanitize option, so I generally use that with no detergents. Evenly distribute 8 ounces of apple juice among the bottles, roughly 2 ounces per liter, 1 ounce per half liter. Be sure to only use sanitized utensils. Gentle pour the cider into the bottles (use a sanitized funnel), being sure to leave 2 inches of space at the top.Be very cautious to not disturb the sludge that’s settled in the bottle

Close up the bottles and set aside at room temp for at least a week. At this point they’re ready. Chill before opening. Will only get better after a couple months, but with such a small batch it’s hard to wait 😉

Want it sweet? Two easy options: add fake sweetener at bottling time, or keep a small bottle of apple juice in the fridge and add an inch or so (to taste) to your glass before pouring in the cider.

That’s it! OK, maybe this is rambly so hopefully it makes sense.

Here are some tips for better results:

  • Yeast nutrient! This is a cheap supplement that’ll give your yeast a bit of a boost.
  • Black tea or oak chips–a single tea bag or clean oak chips can be boiled in a 1/4 cup of water and added to the mix. The tannins add a nice level of complexity commercial apple juices don’t have.
  • Lemon juice! Or lime or citric acid. Real cider is made from cider apples, which are far more tart (acid) and bitter (tannins) than eating/juice apples. The fermenting and aging process further tones this down.
  • Other juice! I particularly like adding 1 part cherry juice to 3 parts apple.
  • Kick it up! Adding apple juice concentrate, table sugar, honey, fructose (fruit sugar), or other natural sweeteners will increase the alcohol level. It WILL NOT make it any sweeter–the yeast will eat it all. For 1 gallon, don’t add more than 5 oz of sugar or honey (about 1 can of concentrate). For honey, just be aware that it’ll take a couple months to fully ferment and you will almost definitely need yeast nutrient.

If you like your results, you can upgrade to a 5-gallon fermenting bucket or glass carboy. I personally use 6.5 gallon carboys along with several 1 gallon jugs and a 3-gallon carboy as well. This let’s me play around, experimenting with different combinations.

Happy brewing!

Posted in Uncategorized | 4 Comments

I would like to introduce you to the newest member of my family

It is the Breville JE900 for those who are curious, and while they should be, they are not paying me for the plug.

I agonized over various juicer options. Most Brevilles I found were $200-400 with some caveats (usually that the pulp leftover was too pulpy wet, and that it had trouble with greens). While I want a Vita-Mix, it’s violent approach to juicing wasn’t what I was looking for. There are a couple other options (one that slow-macerated the juice out) that were also expensive.

THEN the Williams Sonoma outlet came into my life. Not only did they have this juicer for a mere $130 (I’m still not sure that wasn’t a mistake), but it was also 20% off as part of an appliance sale.

What you see in that cup is about 6 ounces of fresh ginger juice. It took longer to photograph the juice than it did to make it.It required about a half pound of ginger to make. Some blogger with a “Jack Lelanne” juicer got about half the yield, though I’ll admit the liquid content of ginger roots varies quite a bit. I got two types of pulp–half in the spinner, bone dry, the other half in the pulp bucket, mildly soggy. Overall, I would initially recommend the Breville without hesitation. It’s also cute.

One issue with ginger beer/ale/etc. recipes out there is they assume you’ll just grate and boil the ginger. That’s fine if you’re an uneducated caveman. I haven’t found any decent recipes involving the use of fresh juice with no boiling. So, in the coming weeks I will be presenting experiments. I’m hoping I can get some guinea pigs to come visit so we can all act like educated cavemen.

Also, with apple season approaching and home brewing supplies in hand, this should be a fun autumn.

Posted in Uncategorized | 3 Comments

Fire & Failure & Future

OK, pro tip: when you plan on making a bunch of new infusions, maybe don’t throw a big impromptu party. As a result, all the infusions previously posted were cracked open prematurely.

I do have to say that the crab apple might be one of my favorite all time infusions, and that’s just after a few days. I need to get more vodka to top it off and I think we can salvage the rest of the fruit to make a less intense infusion, but considering how amazingly tart it turned out, that might not be a bad thing.

I wasn’t overly impressed by the cantaloupe infusion anyhow–the melon wasn’t quite ripe enough. The booze-soaked melon balls were fun.

Other news! I have a juicer AND a home brewing kit. These both are going to cause me problems. I’m currently experimenting with freshly juiced ginger and today will be heading to the home brew shop and whole foods to pick up some essential ingredients.

Posted in Uncategorized | Leave a comment

Sneak preview

Here are four infusions I got started last night:

Infusions, photo by Michael Paydos https://dazedandinfused.wordpress.com

From left to right: 2 quarts of orange infused vodka, 1 quart grapefruit infused vodka, 3 cups intensely sour crabapple infused vodka, and lastly 3 cups of cantaloup infused vodka. The latter two will have posts in the future. Both the previous follow the basic recipe I used last time. I got a bag of organic valencia oranges the other day, mostly so I could have some amazing fresh squeezed juice. Valencias tend to have very thin skin that doesn’t peel well, requiring a zester to do the job well. Grapefruit fortunately peels quite well.

Posted in Uncategorized, Vodka | Leave a comment

Hazelnut infused vodka

Hazelnuts. Photo by Michael Paydos, https://dazedandinfused.wordpress.com

Frangelico is yet another popular liqueur that I love in theory, but always have trouble with how sweet it is. Hazelnuts are sweet enough on their own thanks. Thankfully, infusology gives us an alternative.

Step 1: Get some hazelnuts

Hazelnuts. Photo by Michael Paydos, https://dazedandinfused.wordpress.com

Trader Joes sells them for a very reasonable price. We only need 1 cup for this infusion (unless you double up) but thankfully hazelnuts freeze well in an air-tight container. Look for the freshest hazelnuts you can, and steer clear of pre-chopped varieties. Like spices, the more processed the product is the more essential oils escape–that’s where the flavor is.

Step 2: Smash some hazelnuts

Smashed hazelnuts. Photo by Michael Paydos, http://dazedandinfused.com

In my almond infusion, I recommended a light chop chop using a food processor or blender. However, hazelnuts are softer and oilier, which makes them mush well. This has two advantages: you squeeze out more of the essential oils, enhancing and accelerating the infusing process, and smashing keeps the pieces larges, which prevents nut-sludge that becomes next to impossible to strain out. My preferred method is to take 5-15 nuts and place them between two cutting boards. A cast iron skillet also works, but mine are never clean enough to even consider such applications.

Step 3: Add smush to jar

This is what 1 cup of smashed hazelnuts look like in a 1 quart jar. You can also add a half a vanilla bean and even an inch or so of cinnamon stick if you want.

Step 4: Infuse it!

For 1 cup of hazelnuts, add 3 cups of vodka. Shake the jar well and store in a cool, dark place for at least a month. Like the almond infusion, more time would be even better. During the process, give it a shake whenever you think about it, at least once a week is great.

Step 5: When ready, strain and en-joy

This is just after 5 weeks–a rich, dark infusion. To strain, follow the same instructions from the almond infusion and you’ll be fine–using the smashing process, this is quite a bit easier. I simply used coffee filters (replacing it twice when the straining slowed down).

I haven’t experimented thoroughly with the results just yet. Any frangelico-based drink should be great with this (though much less sweet so add some simple syrup to your preference). I’ll report on my adventures soon, but feel free to share some ideas!

Prost!

Posted in hazelnut, Vodka | 4 Comments